
Photo by Jackson Sophat on Unsplash
Getting Started with HTML: A Beginner's Guide to Building Web Pages


Table of contents
- Essential Tools for Learning HTML
- HTML formatting with Prettier
- An Introduction to HTML: Understanding the Basics
- Starting Your Webpage
- Structure of an HTML Document: Understanding the Anatomy of HTML
- HTML Heading and Paragraph Elements: Adding Text to Your Webpage
- Formatting Text
- HTML Elements: <div> and <span>: Grouping Your HTML Content
- HTML Lists: Organizing Information with Lists
- Using Images: Adding Visual Elements to Your Webpage
- Using Links: Connecting Pages Together
- Using Tables: Displaying Data in a Structured Format
- HTML Forms: Creating Interactive Web Forms
- Useful Resources
Essential Tools for Learning HTML
To get started with learning HTML, you'll need two essential tools: a web browser and a code editor. For the browser, feel free to use your favourite one. As for the code editor, I highly recommend Visual Studio Code (VSCode). It's a versatile editor that is great for web development. Alternatively, you can use CodeSandbox, a cloud-based development platform. While CodeSandbox may be sufficient for this tutorial, I recommend familiarizing yourself with VSCode for a more comprehensive learning experience.
HTML formatting with Prettier
Code formatting is an essential part of writing clean and organized code. To make the process easier, you can use a code formatter like Prettier. Prettier is a popular code formatter that can be installed from the Visual Studio Marketplace using this link: Prettier - Visual Studio Marketplace.
An Introduction to HTML: Understanding the Basics
HTML stands for HyperText Markup Language. It is the standard language for creating web pages and web applications. HTML describes the structure and content of a web page using tags and attributes. Tags are keywords enclosed in angle brackets (< and >) that define how the content should be displayed by a web browser. HTML elements are written with a start tag and an end tag, like this:
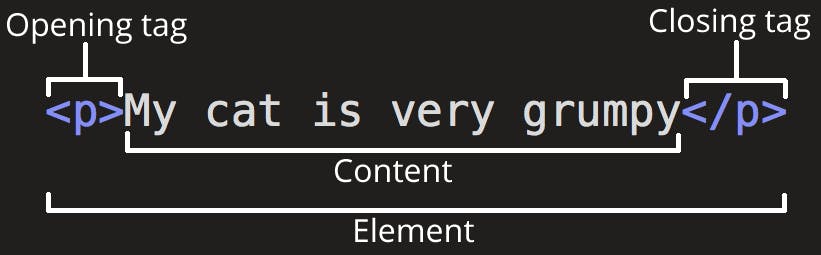
Image source: developer.mozilla.org
Attributes are additional information that modifies the behaviour or appearance of an element. HTML documents can also include other elements such as images, links, forms, scripts, and more.
HTML Attributes: Adding Extra Information to Your HTML Elements
HTML attributes are extra bits of information that you can add to your HTML elements to customize them or change their behaviour.

Image source: developer.mozilla.org
For example, you can use the src attribute to specify the source of an image, or the href attribute to create a link to another webpage. Attributes are written inside the opening tag of an element, after the element name, and have the format name="value". You can use as many attributes as you want for an element, as long as they are separated by spaces. Attributes make your HTML code more flexible.
Starting Your Webpage
To begin, create a folder named "HTML-for-beginners" and open it with your code editor, such as VSCode. Then, create an index.html file within this folder and add some text like "Hello from index.html" then save the file.
To preview your webpage in a browser, you need to run a local server that can serve your file. A simple way to do this is by using npx serve in your terminal. This will start a server on port 3000 allowing to open your webpage in your browser. You can then edit your HTML code and refresh the browser to see the changes. Your terminal will show that the server has started and is serving your file.
npx serve
   ┌─────────────────────────────────────────┐
   │                                         │
   │   Serving!                              │
   │                                         │
   │   - Local:    http://localhost:3000     │
   │   - Network:  http://192.168.1.X:3000   │
   │                                         │
   │   Copied local address to clipboard!    │
   │                                         │
   └─────────────────────────────────────────┘
Simply open your browser and navigate to the http://localhost:3000 address, and you should see your "Hello from index.html" text content displayed. HTML elements provide a variety of options beyond displaying plain text in the browser.
Structure of an HTML Document: Understanding the Anatomy of HTML
An HTML document is a file that contains the code for a web page. It starts with <!DOCTYPE html> which tells the browser what kind of document it is. The next element is <html></html>, which wraps around all the content of the page. This is called the root element. Inside the <html> element, we have two main elements: <head> and <body>. The <head> element contains information about the page, such as its title, style and metadata. The <body> element contains the visible content of the page, such as text, images and links. You can find out more about HTML elements at the HTML elements reference | MDN (mozilla.org) site.
Let's copy the following HTML code and insert it into your index.html file:
<!DOCTYPE html>
<html>
  <head>
    <title>HTML for beginners</title>
  </head>
  <body>
    Hello from index.html
  </body>
</html>
To format your document in VSCode simply use the shift+alt+f shortcut. If a prompt appears asking you to "Configure Default Formatter", select Prettier.
HTML Heading and Paragraph Elements: Adding Text to Your Webpage
One of the most common tasks in HTML is to format text using different elements. For example, if you want to create a heading for your paragraph, you can use the <h1> to <h6> tags. The lower the number, the bigger and more important the heading. The <h1> tag creates the largest heading, and it is recommended to use only one <h1> tag per page because it helps search engines and readers understand what the page is about. For example, <h1> is usually used for the main title of the page, while <h2> - <h6> are used for subheadings.
Let's modify your index.html file as follows:
<!DOCTYPE html>
<html>
  <head>
    <title>HTML for beginners</title>
  </head>
  <body>
    <h1>Heading 1</h1>
    <h2>Heading 2</h2>
    <h3>Heading 3</h3>
    <h4>Heading 4</h4>
    <h5>Heading 5</h5>
    <h6>Heading 6</h6>
  </body>
</html>
The browser automatically adds some white space (a margin) before and after a heading element. You can see that the headings are formatted differently by default, with different font sizes and weights. The <h1> element is the largest and boldest, while the <h6> element is the smallest and lightest. You can customize the appearance of the headings with CSS.
To create a paragraph, you can use the <p> tag. It adds space before and after the text, and it's a block-level element that contains text and other inline elements. The browser removes extra spaces and lines when displaying a paragraph. You can add line breaks with <br /> elements.
You can visually separate different parts of your content by using the <hr /> element, also known as the horizontal rule. This self-closing tag creates a horizontal line or divider on a web page. I use to visually separate the examples.
Let's add paragraphs to your code:
<!DOCTYPE html>
<html>
  <head>
    <title>HTML for beginners</title>
  </head>
  <body>
    <!-- HTML Heading and Paragraph Elements -->
    <h1>First Heading</h1>
    <h2>Second Heading</h2>
    <h3>Third Heading</h3>
    <h4>Fourth Heading</h4>
    <h5>Fifth Heading</h5>
    <h6>Sixth Heading</h6>

    <hr />
    <p>First Paragraph</p>
    <p>
      Second Paragraph; Lorem ipsum dolor sit amet consectetur, adipisicing
      elit. Dolorem dolorum voluptas excepturi quos ex quia ipsum, quis dolores
      id. Repellat ex debitis doloribus nisi rem ipsam eius facilis laudantium
      itaque.
    </p>
    <p>
      Third Paragraph; Lorem ipsum dolor sit amet consectetur, adipisicing elit.
      Dolorem dolorum voluptas excepturi quos ex quia ipsum, quis dolores id.
      Repellat ex debitis doloribus nisi rem ipsam eius facilis laudantium
      itaque.
    </p>
  </body>
</html>
A block-level element always starts on a new line and takes up the full width of its parent container. You can also use other inline elements within a paragraph to change the appearance of the text, such as <b> for bold, <i> for italic, or <a> for links. More about HTML Block and Inline Elements.
Formatting Text
HTML provides several elements that allow you to format text with semantic meaning, conveying information about how the text should be displayed. For example:
<ins> is used to mark text that has been inserted into a document, usually with a different colour or underline.
<strong> is used to mark text that has strong importance, usually with a bold font.
<emp> is used to mark text that has emphasis or stress accent, usually with an italic font.
<small> is used to mark text that has less importance or relevance, usually with a smaller font.
<mark> is used to mark text that has been highlighted for reference or annotation, usually with a yellow background.
<del> is used to mark text that has been deleted from a document, usually with a strikethrough.
<sub> is used to mark text that appears below the baseline of the normal text, such as subscripts in mathematical expressions.
<sup> is used to mark text that appears above the baseline of the normal text, such as superscripts in mathematical expressions.
Let's apply these formatting elements to the third paragraph of your HTML code:
<!-- Formatting Text -->
<p>
  Third Paragraph; <br />
  Lorem <strong>ipsum dolor</strong> sit amet consectetur, adipisicing elit.
  <br />
  <em>Dolorem dolorum</em> <mark>voluptas excepturi</mark>
  <del>quos ex quia ipsum</del>, quis dolores id.<br />
  Repellat <sup>ex debitis</sup> doloribus <sub>nisi</sub> rem ipsam
  <small>eius facilis</small> laudantium itaque.
</p>
HTML Elements: <div> and <span>: Grouping Your HTML Content
<div> and <span> are two common HTML elements that are used to group other elements together. The main difference between them is that <div> is a block-level element and <span> is an inline element. Block-level elements create a new line in the document and take up the full width available, while inline elements stay on the same line and only take up as much space as needed.
To demonstrate how these elements work, let's add the following code after the third paragraph:
<!-- HTML Elements: <div> and <span> -->
<hr />
<div>First Container</div>
<div>Second Container</div>
<span>First inline element</span>
<span>Second inline element</span>
For example, you can use <div> to create sections or containers for your web page layout and use <span> to style a part of a text or image(s).
HTML Lists: Organizing Information with Lists
HTML lists are a way of organizing and displaying data on a web page. There are three types of HTML lists: unordered, ordered and definition.
Unordered lists use the <ul> tag and display items with bullet points. Each item is enclosed in a <li> tag. For example:
<!-- HTML lists -->
<hr />
<ul>
 <li>Cats</li>
<li>Dogs</li>
</ul>
This will show a list of cats and dogs with bullet points.
Ordered lists use the <ol> tag and display items with numbers or letters. Each item is also enclosed in a <li> tag. For example:
<ol>
  <li>Preheat oven to 190°C.</li>
  <li>Mix flour, sugar and butter in a bowl.</li>
  <li>Add eggs and vanilla extract and stir well</li>
</ol>
This will show a list of steps to make a cake with numbers.
Definition lists use the <dl> tag and display items with terms and descriptions. Each term is enclosed in a <dt> tag and each description is enclosed in a <dd> tag. For example:
<dl>
  <dt>AI</dt>
  <dd>Artificial Intelligence</dd>
  <dt>ML</dt>
  <dd>Machine Learning, </dd>
</dl>
This will show a list of acronyms and their meanings.
You can add all three types of lists to your index.html file to practice and explore their use in organizing and presenting information.
Using Images: Adding Visual Elements to Your Webpage
Images are a great way to make your web pages more attractive and informative. To add an image to your HTML document, you need to use the <img /> tag. This tag is self-closing, which means it doesn't need a closing tag like </img>. You also need to specify some attributes for the image, such as its source (src), width, height and alternative text (alt).
Let's download the following image and add it to your project directory and name it mdn.png.

After adding the image to your project directory, add the following code snippet after the lists:
<!-- Using images -->
<hr />
<img src="mdn.png" width="500" height="300" alt="HTML for beginners" />
<!-- Image source: https://developer.mozilla.org/en-US/ -->
This code will display an image from MDN Web Docs on your webpage with a width of 500 pixels and a height of 300 pixels. The alt attribute describes the image for screen readers or browsers that can't load images.
You can also experiment with changing the height, width and modify the image name in the src attribute. Hint: the browser will try to find and show an image called mdn_new_name.png instead of mdn.png. If the image name is correct and the file exists in the same folder as your HTML document, then you will see the image on your page. If not, you will see a broken image icon and the alt text.
Using Links: Connecting Pages Together
Links are an important way to connect web pages together and allow users to navigate between them easily. To create a link in HTML, you use the anchor tag, which looks like this: <a></a>. Inside the anchor tag, you include the text or image that you want to be clickable, and you use the href attribute to specify the URL that you want the link to go to.
An example of a link is <a href="https://developer.mozilla.org/">MDM</a> This link has text "MDM" which is the visible part of the link, and an href attribute that points to https://developer.mozilla.org/, which is a website that provides a lot of information about web development.
You can also create links between pages on your own webpage. For example, if you have a main page called index.html and an about page called about.html in the same folder, you can create a link from the main page to the about page.
Create an about.html file in your project folder. Type "!" then hit the TAB key and VSCode will automatically generate a basic HTML skeleton for you. Add between the body tags the following in about.html: <a href="index.html">Main page</a> and <a href="about.html">About</a> in your index.html.
 <!-- Using Links  index.html-->
<hr />
<a href="https://developer.mozilla.org/">MDM</a>
<a href="about.html">About</a>
This will create a clickable text link that says "About" and will take you to the "About" page when you click on it. It's important to note that when creating links between pages on your own website, you can use either absolute or relative URLs for the href attribute. Absolute URLs include the full address of the page, starting with "http://" or "https://", while relative URLs only include the path to the page relative to the current page. For example, if you're on the "index.html" page and you want to link to the "about.html" page in the same folder, you can use a relative URL like this:
<a href="about.html">About</a>
If you want to link to a page in a different folder, you can use a relative URL with a path to the page, like this:
<a href="folder/about.html">About</a>
By using links effectively, you can create a well-organized and easy-to-navigate website for your users.
Using Tables: Displaying Data in a Structured Format
HTML tables are a great way to organize and display data in rows and columns on your web page. They make it easy to compare data and read it in a structured format. To create a table, you need to use the <table> element, which contains one or more <tr> elements for table rows, one or more <th> elements for table headers, and <td> elements for table cells.
Here is an example of a simple table with two columns and two rows:
<!-- Using tables -->
    <hr />
    <table>
      <thead>
        <tr>
          <th>Column A</th>
          <th>Column B</th>
        </tr>
      </thead>
      <tbody>
        <tr>
          <td>Row 1.A</td>
          <td>Row 1.B</td>
        </tr>
        <tr>
          <td>Row 2.A</td>
          <td>Row 2.B</td>
        </tr>
      </tbody>
    </table>
In the code, the following elements are used:
The
<table>element defines the structure of the table and contains all the other elements inside it.The
<thead>element groups the header content in the table.The
<tbody>element groups the body content in the table.The
<tr>element defines a table row.The
<th>element defines a header cell in the table. By default, it is displayed in bold and centered.The
<td>element defines a data cell in the table.
If you want to learn more about tables, you can check out: The Table element | MDN (mozilla.org
HTML Forms: Creating Interactive Web Forms
An HTML form is a convenient way to collect user input on a web page. A form consists of one or more elements that allow the user to enter different types of data, such as text, numbers, choices, etc. The form element has an opening and closing tag: <form> and </form>. Inside the form element, you can use various elements to create different kinds of inputs.<form> <!-- form elements go here --> </form> Here are some input examples that you can use. Copy and paste them to your index.html:
- To create a single-line text field, you can use the input element with the type attribute set to "text". You can also use the
<label>element to provide descriptive text for the input. The label element has aforattribute that matches the id attribute of the input element, like this:
  <label for="textfield">Single-line text field</label><br />
  <input type="text" id="textfield" /><br /><br />
- To create a multiline text area, you can use the
<textarea>element. As before, you can use the<label>element with the for attribute:
  <label for="multiline">Multiline text</label><br />
  <textarea id="multiline"></textarea><br /><br />
- To create a drop-down list of options, you can use the
<select>element. Inside the select element, you can use one or more option elements. Thevalueattribute of the option element represents the value that will be submitted when the form is submitted. As before, use the<label>element to provide descriptive text:
  <label for="preference">Are you a cat person or a dog person?</label
  ><br />
  <select id="preference">
    <option value="cat">Cat person</option>
    <option value="dog">Dog person</option>
  </select>
  <br /><br />
- To create radio buttons that allow the user to choose one option from a set of options, use the
<input>element with thetypeattribute set to "radio". Each radio button in a group should have the samenameattribute so that only one can be selected at a time. Use the<label>as before:
  <label>How do you feel today?</label><br />
  <input type="radio" name="mood" value="happy" id="happy" />
  <label for="happy">Happy as a clam</label>
  <br />
  <input type="radio" name="mood" value="ecstatic" id="ecstatic" />
  <label for="ecstatic">Ecstatic as a unicorn</label>
  <br /><br />
- To create a group of checkboxes that allow the user to choose one or more options from a set of options, you can use the
<input>element with thetypeattribute set to "checkbox". Each checkbox in a group should have a differentnameandvalueattribute so that they can be distinguished when submitted. You can also use the<label>element with theforattribute as before:
<label>Checkbox example</label> <br />
<input type="checkbox" id="funny" name="funny" value="yes" />
<label for="funny">This is a funny example</label><br />
<input type="checkbox" id="not-funny" name="not-funny" value="no" />
<label for="not-funny">This is not a funny example</label><br /><br />
You can view the complete code here:
To make the submit button work with JavaScript, you need to write some code that will handle the form submission event. One way to do this is to use the addEventListener() method on the form element and pass it a function that will run when the event occurs.
Useful Resources
Here are some helpful resources for learning and using HTML:
Introduction to HTML - Learn web development | MDN (mozilla.org)
What's in the head? Metadata in HTML - Learn web development | MDN (mozilla.org)
HTML elements reference - HTML: HyperText Markup Language | MDN (mozilla.org)
Content categories - HTML: HyperText Markup Language | MDN (mozilla.org)
Global attributes - HTML: HyperText Markup Language | MDN (mozilla.org)
HTML attribute reference - HTML: HyperText Markup Language | MDN (mozilla.org)
All of these resources provided by the Mozilla Developer Network (MDN) are good sources for learning HTML syntax and features.