

Photo by Mpho Mojapelo on Unsplash
Setting up a Production-Ready Webpack-ReactJS Configuration for Your Project


Introduction
Setting up a project from scratch can be a daunting task, especially if you are new to the world of web development. But fear not, with the right tools and guidance, you can create a production-ready webpack configuration that will help streamline your development process and improve the performance of your website or application. In this article, you will be taken through the steps required to create a webpack configuration from start to finish.
First, you will need to meet the prerequisites needed for this project, including installing Node.js . Then, you will dive into the steps required to set up your project folder and build your first webpage using Webpack. From there, you will learn how to configure the Webpack Dev Server, set up Babel for transpilation, and generate chunks in Webpack.
To help you optimize your configuration, we will also cover how to use the Webpack Bundle Analyzer to analyze your bundle and how to optimize your configuration to improve performance. Finally, you will be shown how to integrate ReactJS into your project, so you can start building dynamic and interactive user interfaces. By the end of this article, you will have a better understanding of how to set up a production-ready Webpack configuration for your project.
Github repository
To help you follow along with the tutorial, I have created a repository for the tutorial steps where you can access the code. However, please note that I haven’t included the full code in the article, every time as it is already quite lengthy. In some cases, certain topics may even be the subject of a separate article.
For the 7th and 8th steps, you can find a folder named “full” that contains the complete code. Once you’ve run an npm install, the code should work seamlessly. Additionally, I’ve included a link within each step’s chapter that directs you to the specific code corresponding to that step, where the modified or added files are located. Repository link.
Meeting Prerequisites
Before you begin, you need to have Node.js installed on your computer. I used v18.13.0 LTS. You can download it from the official Node.js website if you don’t have it already. Visual Studio Code is used in this tutorial as the preferred text editor.
Step 1: Setting up Your Project Folder
To start, create a new directory for your project and navigate into it:
mkdir -p my-react-project/src/assets && cd my-react-project
Next, create the src folder and index.html and index.js files:
touch ./src/assets/index.html ./src/index.js
Let’s copy the following code and paste it into the index.html file:
<!DOCTYPE html>
<html lang="en">

<head>
    <meta charset="UTF-8">
    <meta name="viewport" content="width=device-width, initial-scale=1.0">
    <title>My Reactjs app</title>
</head>

<body>
    <h1>Hey there!</h1>
    <div id="root"></div>
</body>

</html>
Let’s copy the following code and paste it into the index.js file:
const helloDiv = document.createElement("div");
helloDiv.innerHTML = "Hey there from JavaScript!";

console.log('Hey there from JavaScript!');
document.getElementById('root').append(helloDiv);
I’ve added a workplace settings file to the directory my-react-project\.vscode\settings.json in your project. You can use this file as is or modify it according to your specific needs. Feel free to make any necessary changes to the settings to better suit your preferences and work style. To learn more about customizing your development environment using VSCode settings, you can visit the official documentation at here.
Step 2: Building Your First Webpage with Webpack
Webpack is a module bundler that allows you to write modular code and bundle it into a single file. To set it up, first run npm init -y to create a package.json file. Then, install webpack and the webpack command line interface as development dependencies:
npm init -y
npm install -D webpack webpack-cli
The html-webpack-plugin is a useful plugin that allows to generate an HTML file that includes the generated Webpack bundle. This plugin is incredibly useful for web development as it saves time and effort by automating the creation of an HTML file that is ready to be served to the client. To install it , run the following command:
npm install -D html-webpack-plugin
It’s time to create your webpack configuration file, so hit the following command in your terminal:
touch webpack.config.js
Then add the following lines:
const path = require('path');
const HtmlWebpackPlugin = require('html-webpack-plugin');

const config = {
    entry: "./src/index.js",
    output: {
        filename: "main.js",
        path: path.resolve(__dirname, "dist"),
    },
    plugins: [
        new HtmlWebpackPlugin({
            template: 'src/assets/index.html',
        }),
    ],
};

module.exports = () => {
    return config;
};
In order to build your bundle using Webpack, you need to add new scripts to your package.json file.
  "scripts": {
    "build:prod": "webpack --mode production",
    "build:dev": "webpack --mode development"
  },
Once you have added the “build” scripts to your package.json file, you can run it from the command line using:
npm run build:dev
or
npm run build:prod
This will execute the webpack build process and generate the bundled JavaScript file and the HTML file in the output directory “dist” specified in your webpack configuration. You can try out both scripts and check the result in your dist folder.
After building your webpage files using Webpack, you can use the following command:
npx serve dist
This command will serve the contents of the dist directory in your project as a static web server. The dist directory should contain the bundled JavaScript file and the HTML file generated by Webpack during the build process.
The serve command is provided by the serve package, which is a simple command-line utility for serving static files. The npx prefix ensures that the command is executed using the serve package installed in your project's local node_modules directory, rather than a globally installed version.
After running the command, you should see a message in your terminal similar to the following:
   ┌─────────────────────────────────────────┐
   │                                         │
   │   Serving!                              │
   │                                         │
   │   - Local:    http://localhost:3000     │
   │   - Network:  http://192.168.1.X:3000   │
   │                                         │
   │   Copied local address to clipboard!    │
   │                                         │
   └─────────────────────────────────────────┘
Then open your browser to check your website, you should see the text “Hey there!” and “ Hey there from JavaScript!” in the browser window and “ Hey there from JavaScript! “ in the console (ctrl+shift+i). Whenever you make changes to your code, you have to manually run the Webpack build process and use npx serve to see the changes in your webpage. It’s not a good development experience, but fortunately there is a good solution.
It’s good practice to use a linter such as ESLint in your projects. Linting can help catch common errors and improve code consistency, making it easier to maintain and collaborate on your codebase. To benefit from ESLint’s powerful linting capabilities, you can easily add it to your project:
npm install -D eslint eslint-webpack-plugin eslint-plugin-import
The ESLint extension must be installed from the marketplace.
The command ”npm init @eslint/config” is used to initialize an ESLint configuration file for your project. This command prompts you with a series of questions in the command line interface to create a .eslintrc.js configuration file based on your preferences.
npm init @eslint/config
The prompts and my answers:
$ npm init @eslint/config
√ How would you like to use ESLint? · style
√ What type of modules does your project use? · esm
√ Which framework does your project use? · react
√ Does your project use TypeScript? · No / Yes
√ Where does your code run? · browser, node
√ How would you like to define a style for your project? · prompt
√ What format do you want your config file to be in? · JavaScript
√ What style of indentation do you use? · 4
√ What quotes do you use for strings? · single
√ What line endings do you use? · unix
√ Do you require semicolons? · No / Yes
The config that you've selected requires the following dependencies:

eslint-plugin-react@latest
√ Would you like to install them now? · No / Yes
√ Which package manager do you want to use? · npm
Installing eslint-plugin-react@latest
I’ve added some basic ESLint rules to your project’s configuration file, and commented out some that will be used later when you add ReactJS. During the initialization of your ESLint configuration file, you’ll be asked to select a framework for your project. You can choose “None of these” and set other frameworks later. However, selecting React will result in the eslint-plugin-react package being installed.
module.exports = {
    // 'parser': '@babel/eslint-parser',
    'env': {
        'browser': true,
        'es2021': true,
        'node': true,
    },

    'settings': {
        // 'react': {
        //     'version': 'detect',
        // },
    },

    'extends': [
        'eslint:recommended',
        // 'plugin:react/recommended',
        'plugin:import/recommended',
        'plugin:import/errors',
    ],

    'overrides': [],

    'parserOptions': {
        'ecmaVersion': 'latest',
        'sourceType': 'module',
        // 'ecmaFeatures': {
        //     'jsx': true,
        // },
    },

    'plugins': [
        // 'react',
        'import',
    ],

    'rules': {
        'indent': ['error', 4],
        'eol-last': ['error', 'always'],
        'linebreak-style': ['error', 'unix'],
        'quotes': ['error', 'single'],
        'semi': ['error', 'always'],
        'no-extra-parens': 'error',
        'camelcase': 'error',
        'curly': 'error',
        'comma-spacing': [
            'error',
            {
                'before': false,
                'after': true
            }
        ],
    },
};
This will help ensure your code follows best practices and is free of errors. You can customize these rules. Here you can find ESLint’s rule reference. And a List of ESLint configs and plugins.
Step 3: Configuring the Webpack Dev Server
The webpack-dev-server webpack plugin is a useful tool that allows you to serve the code on a local web server, providing hot reloading, fast builds and other features that make development smoother. With webpack-dev-server you can see your changes in real-time without having to manually refresh your browser, which can save a lot of time. Let’s install this package too.
npm install -D webpack-dev-server
Once the installation is complete, you will need to make some changes to your package.json and to webpack.config.js files.
In your package.json file, you need to add a new script to start the development server.
...
"scripts": {
    "start": "webpack serve --mode development",
    ...
  },
...
You can run npm start in your terminal to start the app on your local server. This will execute the start script and launch the dev server, which will open a new browser window with your project.
when you try to debug your code, you may encounter problems. This is because the “devtool” option for source mapping has not been configured. Without source mapping, the browser console will only show you the bundled, compiled code, which may not be very helpful if you want to debug your code.
HMR is a valuable tool for web development, allowing you to see code changes on the screen without a full reload, and can greatly improve your development experience with just a little configuration.
To enable Hot Module Replacement (HMR) in your project, you’ll need to modify the webpack.dev.js configuration file by adding the hot and port options to the devServer object, as well as manually adding the HotModuleReplacementPlugin to your configuration. Additionally, you should add the devtool option to your webpack.config.js file to help with debugging and improve the overall development experience.
const path = require('path');
const HtmlWebpackPlugin = require('html-webpack-plugin');
const ESLintPlugin = require('eslint-webpack-plugin');
const { HotModuleReplacementPlugin } = require('webpack');

const config = {
    entry: './src/index.js',
    output: {
        filename: 'main.js',
        path: path.resolve(__dirname, 'dist'),
    },
    devServer: {
        port: 3000,
        hot: true,
    },
    devtool: 'eval-cheap-module-source-map',
    plugins: [
        new HotModuleReplacementPlugin({}),
        new HtmlWebpackPlugin({
            template: 'src/assets/index.html',
            filename: 'index.html',
        }),
        new ESLintPlugin({ failOnError: true }),
    ],
};

module.exports = () => {
    return config;
};
Now you can easily debug your code. You can read more about the possible configurations of source maps here: Devtool | webpack. And about HMR here: HMR.
Step 4: Setting up Babel for Transpilation
You may want to use the latest language features or experimental syntax that are not yet fully supported by all browsers. You can use Babel, a tool that transpiles modern JavaScript into a format compatible with older browsers.
Let’s install the necessary packages:
npm install -D @babel/core @babel/cli @babel/preset-env babel-loader core-js cross-env
@babel/cli: This package provides a command-line interface (CLI) for running Babel. You can use it to transpile files and directories from the command line, or to set up custom scripts in your package.json file.
@babel/core: This is the main Babel package providing core transpilation functionality. It is responsible for parsing, transforming, and generating code.
@babel/preset-env : This package is a collection of plugins that allow Babel to transpile the latest JavaScript syntax and features, based on the environment(s) you are targeting. It can dynamically determine which plugins to use based on the browser versions you want to support.
babel-loader: This package is a webpack loader that allows you to use Babel with webpack. It will automatically transpiles your code with Babel before bundling it with webpack.
core-js: This package provides polyfills for various JavaScript features and APIs that may not be available in older browsers. It is used by @babel/preset-env to provide these polyfills on-demand
cross-env: This is a package that provides a way to set environment variables across different operating systems. We will use it to set the
NODE_ENVenvironment variable to development or to production.
To configure Babel, let’s create a babel.config.js file in the root directory and add the following configuration to it.
touch babel.config.js
// babel.config.js
const babelConfig = {
    presets: [
        [
            "@babel/preset-env",
            {
                targets: ['> 0.25%', 'not dead'],
                modules: false,
                useBuiltIns: "usage",
                corejs: { "version": 3.28 },
                debug: false,
            }
        ],

    ],
    plugins: [],
}

module.exports = api => {
    api.cache.using(() => process.env.NODE_ENV);

    return babelConfig;
}
Let’s modify the package.json file as follows:
  ...
"scripts": {
    "start": "ross-env NODE_ENV=development webpack serve --mode development",
    "build:prod": "cross-env NODE_ENV=production webpack --mode production",
    "build:dev": "cross-env NODE_ENV=development webpack --mode development"
  },
...
Let’s copy and paste the modules section into yourwebpack.config.js.
...
devtool: 'eval-cheap-module-source-map',
    module: {
        rules: [
            {
                test: /\.(js|jsx)$/,
                exclude: /node_modules/,
                use: ['babel-loader'],
            },
        ],
    },
...
To test Babel on the command line, you can use the following command:
npx babel src/index.js --out-file dist/transpiled-index.js
Step 5: Generating Chunks in Webpack
One of the key features of Webpack is the ability to split code into multiple “chunks”. These chunks can then be loaded asynchronously to improve the performance of web applications. An important aspect of this feature is the ability to lazily load chunks.
Webpack gives you the flexibility to customize your build based on your target environment: development or production. With development configuration for faster builds and better debugging experience and production configuration for optimized and minimized output. The common configuration file can hold the shared settings between the two configurations.
Type the following commands in your bash terminal:
npm install -D webpack-merge clean-webpack-plugin lodash moment sass-loader sass css-loader style-loader mini-css-extract-plugin css-minimizer-webpack-plugin
touch webpack.common.js webpack.dev.js webpack.prod.js
mkdir -p src/components & touch ./src/index.scss & touch ./src/components/{App.js,app.scss,MostPoisonousAnimalsList.js,FastestAnimalsList.js,LongestLivingAnimalsList.js,Data.js}
webpack-merge: This is a package that provides a
mergefunction for combining multiple webpack configurations into a single configuration.clean-webpack-plugin: This is a plugin that cleans the output directory before emitting new files.
lodash: This is a utility library that provides a lot of useful functions for working with arrays, objects, and strings.
moment: This is a library for working with dates and times in JavaScript. It provides an easy-to-use API for parsing, manipulating, and formatting dates and times.
sass-loader: This is a loader for Webpack, a popular module bundler for JavaScript applications, that allows you to use the Sass preprocessor to write your CSS styles. Sass offers many additional features and functionality over traditional CSS, such as variables, mixins, and nested rules.
sass: This is the Sass compiler itself, which is a dependency of the sass-loader package. It’s responsible for compiling your Sass code into regular CSS code that can be interpreted by browsers.
css-loader: This is another loader for Webpack that allows you to import CSS files into your JavaScript code. It also handles CSS modules, which are a way to scope CSS styles to specific components or modules in your application.
style-loader: This is a loader for Webpack that injects CSS styles into the HTML document at runtime. It’s used in conjunction with the css-loader to allow importing CSS files into your JavaScript code.
mini-css-extract-plugin: This is a plugin for Webpack that extracts CSS styles into separate files, rather than injecting them into the HTML document at runtime. This can be useful for improving performance.
css-minimizer-webpack-plugin: This plugin optimizes and minimizes CSS files during the build process. It uses the CSSnano library to perform the actual optimization. By reducing the size of CSS files, this package can help to improve the performance and loading time of web applications.
You will have the following project structure after creating the files:
|- node_modules
    |- src
        |- assets
            |- index.html
      + |- components
          + |- App.js
          + |- App.scss
          + |- Data.js
          + |- LongestLivingAnimalsList.js
          + |- MostPoisonousAnimalsList.js
          + |- FastestAnimalsList.js
        |- index.js
      + |- index.scss
    |- babel.config.js
    |- package.json
    |- package-lock.json
  + |- webpack.common.js
  + |- webpack.dev.js
  + |- webpack.prod.js
  - |- webpack.config.js
Delete the following line from ./src/assets/index.html: <h1>Hey there!</h1>
Copy and paste the following code into index.js.
// index.js
import App from './components/App';
import './index.scss';


document.getElementById('root').append(App());
Copy and paste the following code into index.scss.
body {
    background-color: #202325;
    color: #c8c3bc;
    position: relative;
    height: 100%;
    width: 100%;
    margin: 0;
}
Copy and paste the following code into App.js.
// App.js
import LongestLivingAnimals from './LongestLivingAnimalsList';
import './app.scss';

export default () => {
    const container = document.createElement('div');
    const appTittle = document.createElement('h1');
    const topFiveLists = document.createElement('div');

    container.setAttribute('class', 'container');
    appTittle.setAttribute('class', 'app-title');
    appTittle.innerHTML = 'Animal World Top 5 Lists';
    topFiveLists.setAttribute('class', 'top-five-lists');

    import(/* webpackChunkName: "MostPoisonousAnimalsList" */ './MostPoisonousAnimalsList')
        .then(({ getMostPoisonousAnimalsList }) => {
            topFiveLists.appendChild(getMostPoisonousAnimalsList());
        });
    import(/* webpackChunkName: "FastestAnimalsList" */'./FastestAnimalsList')
        .then(({ getFastestAnimalsList }) => {
            topFiveLists.appendChild(getFastestAnimalsList());
        });

    topFiveLists.appendChild(LongestLivingAnimals());
    container.append(appTittle, topFiveLists);

    return container;
};
Copy and paste the following code into app.scss.
.container {
    position: relative;
    max-width: 500px;
    width: 100%;
    padding: 5px 30px 30px 30px;
    border-radius: 10px;
    background-color: #181a1b;
    margin: 50px auto 0;
    box-shadow: 1px 3px 13px #000000;
}

.app-title {
    text-align: center;
    opacity: 0.5;
}

.date {
    float: right;
}

.list-container {
    align-items: center;
    background-color: #3b3b3b;
    padding: 10px 15px;
    border-radius: 8px;
    margin-top: 10px;
    position: relative;
}
Copy and paste the following code into Data.js. I retrieved the data for the lists from this source.
// Data.js
export const fastestAnimals = [
    { name: 'Peregrine Falcon', id: 1, speed: '322' },
    { name: 'White Throated Needletail', id: 2, speed: '171' },
    { name: 'Frigate Bird', id: 3, speed: '153' },
    { name: 'Spur-Winged Goose', id: 4, speed: '142' },
    { name: 'Cheetah', id: 5, speed: '113' },
];

export const mostPoisonousAnimals = [
    { name: 'Pufferfish', id: 1 },
    { name: 'Striated Surgeonfish', id: 2 },
    { name: 'Rough-skinned Newt', id: 3 },
    { name: 'Comb star', id: 4 },
    { name: 'Spanish fly', id: 5 },
];

export const longestLivingAnimals = [
    { name: 'Sponges & Corals', id: 2, lifeSpan: '11000' },
    { name: 'Greenland Shark', id: 4, lifeSpan: '500' },
    { name: 'Ocean Quahog', id: 3, lifeSpan: '507' },
    { name: 'The Immortal Jellyfish', id: 1, lifeSpan: 'Immortal' },
    { name: 'Giant Tortoise', id: 5, lifeSpan: '250' },
];
Copy and paste the following code into LongestLivingAnimalsList.js.
// LongestLivingAnimalsList.js
import { longestLivingAnimals } from './Data';
import { forEach, sortBy } from 'lodash';


export default () => {
    const listContainer = document.createElement('div');
    const orderedList = document.createElement('ol');

    listContainer.className = 'list-container';
    listContainer.innerHTML = 'Longest Living Animals';

    forEach(sortBy(longestLivingAnimals, 'id'), (animal) => {
        const listItem = document.createElement('li');
        listItem.innerHTML = `${animal.name}, Lifespan: ${animal.lifeSpan}`;
        orderedList.appendChild(listItem);
    });

    listContainer.appendChild(orderedList);

    return listContainer;
};
Copy and paste the following code into MostPoisonousAnimalsList.js.
// MostPoisonousAnimalsList.js
import { mostPoisonousAnimals } from './Data';
import moment from 'moment';
import { forEach } from 'lodash';


export const getMostPoisonousAnimalsList = () => {
    const listContainer = document.createElement('div');
    const span = document.createElement('span');
    const orderedList = document.createElement('ol');

    listContainer.className = 'list-container';
    listContainer.innerHTML = 'Most Poisonous Animals';
    span.className = 'date';
    span.innerHTML = ` Date ${moment().format('MMM Do')}`;

    forEach(mostPoisonousAnimals, (animal) => {
        const listItem = document.createElement('li');
        listItem.innerHTML = `${animal.name}`;
        orderedList.appendChild(listItem);
    });

    listContainer.appendChild(span);
    listContainer.appendChild(orderedList);

    return listContainer;
};
Copy and paste the following code into FastestAnimalsList.js.
// FastestAnimalsList.js
import { fastestAnimals } from './Data';
import moment from 'moment';
import { forEach } from 'lodash';


export const getFastestAnimalsList = () => {
    const listContainer = document.createElement('div');
    const span = document.createElement('span');
    const orderedList = document.createElement('ol');

    listContainer.className = 'list-container';
    listContainer.innerHTML = 'Fastest Animals';
    span.className = 'date';
    span.innerHTML = ` Date ${moment().format('MMM Do')}`;

    forEach(fastestAnimals, (animal) => {
        const listItem = document.createElement('li');
        listItem.innerHTML = `${animal.name}, Speed: ${animal.speed} kph`;
        orderedList.appendChild(listItem);
    });

    listContainer.appendChild(span);
    listContainer.appendChild(orderedList);

    return listContainer;
};
You need to modify the “scripts” section in your package.json file as follows.
  ...
"scripts": {
    "start": "cross-env NODE_ENV=development webpack serve --mode development --config webpack.dev.js --progress",
    "build:prod": "cross-env NODE_ENV=production webpack --mode production --config webpack.prod.js --progress",
    "build:dev": "cross-env NODE_ENV=development webpack --mode development --config webpack.dev.js --progress"
  },
...
So far you have only had one Webpack configuration file. You need to split your config into a production webpack.prod.js and a development webpack.dev.js configuration. Why? Because the purpose of these two configs is different. The production config focuses on performance and optimization. And with the development config, the focus is on seamless development. You also have a third configuration file called webpack.common.js, where you keep the common configuration.
In the output section of the webpack.common.js configuration, we can define the filename for our initial chunks using the [name]-init template. By default, this will be the name of the entry point, in our case ‘main’. You can also use the [name] template to create a template for the filenames of your output files. The chunkFilename option specifies the filename for our non-initial async chunks. You can use the webpackChunkName annotation to name our async chunks. You can set this annotation in the import statement when using the import() function to dynamically import modules. For example:
import(/* webpackChunkName: "my-chunk-name" */ './path/toyour/module')
Let’s copy and paste the following code into webpack.common.js.
// webpack.common.js
const path = require('path');
const HtmlWebpackPlugin = require('html-webpack-plugin');
const { CleanWebpackPlugin } = require('clean-webpack-plugin');

module.exports = {
    entry: {
        main: './src/index.js'
    },
    output: {
        filename: '[name]-init.js',
        chunkFilename: '[name]-async.js',
        path: path.resolve(__dirname, 'build'),
    },
    module: {
        rules: [
            {
                test: /\.(js|jsx)$/,
                exclude: /node_modules/,
                use: ['babel-loader'],
            },
            {
                // https://webpack.js.org/guides/asset-management/#loading-images
                // https://webpack.js.org/guides/asset-management/#loading-fonts
                test: /\.(eot|svg|ttf|woff|woff2|png|jpg|jpeg|gif|otf)$/i,
                type: 'asset',
            },
        ],
    },
    plugins: [
        new HtmlWebpackPlugin({
            template: 'src/assets/index.html',
            filename: 'index.html'
        }),
        new CleanWebpackPlugin(),
    ],
};
The module configuration block in a Webpack config file specifies the rules for how to handle different types of files during the build process.
The first rule, defined with test and use, tells Webpack to use the babel-loader to transpile any JavaScript or JSX files in the project, except those in the node_modules directory.
The second rule, defined with test and type, tells Webpack to treat certain file types as assets. This means that these files will be output to the build directory and their paths will be updated in any relevant code files. The type: 'asset' option specifies that Webpack should use its built-in asset handling functionality to handle these files.
Let’s copy and paste the following code into webpack.dev.js.
// webpack.dev.js
const { merge } = require('webpack-merge');
const ESLintPlugin = require('eslint-webpack-plugin');
const { HotModuleReplacementPlugin } = require('webpack');
const commonConfig = require('./webpack.common.js');

const devConfig = {
    devServer: {
        port: 3000,
        hot: true,
    },
    devtool: 'eval-cheap-module-source-map',
    module: {
        rules: [
            {
                test: /\.css$/i,
                use: [
                    'style-loader',
                    'css-loader',
                ],
            },
            {
                test: /\.s[ac]ss$/i, // https://webpack.js.org/loaders/sass-loader/
                use: [
                    {
                        loader: 'style-loader',
                    },
                    {
                        loader: 'css-loader', // https://webpack.js.org/loaders/css-loader/
                        options: {
                            modules: {
                                mode: 'icss'
                            }
                        }
                    },
                    {
                        loader: 'sass-loader',
                    }
                ],
            },
        ],
    },
    plugins: [
        new HotModuleReplacementPlugin({}),
        new ESLintPlugin({ failOnError: false }),
    ],
};

module.exports = () => {
    return merge(commonConfig, devConfig);
};
In the webpack.prod.js, your production build is not optimized, just look at the size of the generated files after you run npm run build:prod, they may look suspicious. The code obfuscation and the splitChunks plugin are disabled through the optimization object configuration. Manually inspecting the bundles for duplicated code is not a reasonable task, so it’s better to use the Webpack Bundle Analyzer. More about chunks.
Let’s copy and paste the following code into webpack.prod.js.
// webpack.prod.js
const { merge } = require('webpack-merge');
const commonConfig = require('./webpack.common.js');
const MiniCssExtractPlugin = require('mini-css-extract-plugin');
const CssMinimizerPlugin = require('css-minimizer-webpack-plugin');
const TerserPlugin = require('terser-webpack-plugin');
const ESLintPlugin = require('eslint-webpack-plugin');

const prodConfig = {
    optimization: {
        minimize: false,
        minimizer: [
            new CssMinimizerPlugin(),
            new TerserPlugin({
                parallel: 4,
            })
        ],
        splitChunks: false
    },
    devtool: false,
    module: {
        rules: [
            {
                test: /\.css$/i,
                use: [
                    {
                        loader: MiniCssExtractPlugin.loader,
                    },
                    'css-loader',
                ]
            },
            {
                test: /\.s[ac]ss$/i, // https://webpack.js.org/loaders/sass-loader/
                use: [
                    {
                        loader: MiniCssExtractPlugin.loader,
                    },
                    {
                        loader: 'css-loader', // https://webpack.js.org/loaders/css-loader/
                        options: {
                            modules: {
                                mode: 'icss'
                            }
                        }
                    },
                    {
                        loader: 'sass-loader',
                    }
                ],
            },

        ],
    },
    plugins: [
        // https://webpack.js.org/plugins/mini-css-extract-plugin/#advanced-configuration-example
        new MiniCssExtractPlugin({
            filename: '[name].css',
            chunkFilename: '[name].chunk.css',
        }),
        new ESLintPlugin({ failOnError: true }),
    ],
};

module.exports = () => {
    return merge(commonConfig, prodConfig);
};
To complete this project, you will need to use CSS, and the necessary packages and configurations have already been added. I won’t go into detail here, as all the information, examples and explanations you need can be found on the Webpack’s documentation page.
Let’s check your site. To do so, run the “npm start” command in your terminal, and then open “http://localhost:3000/" in your web browser.
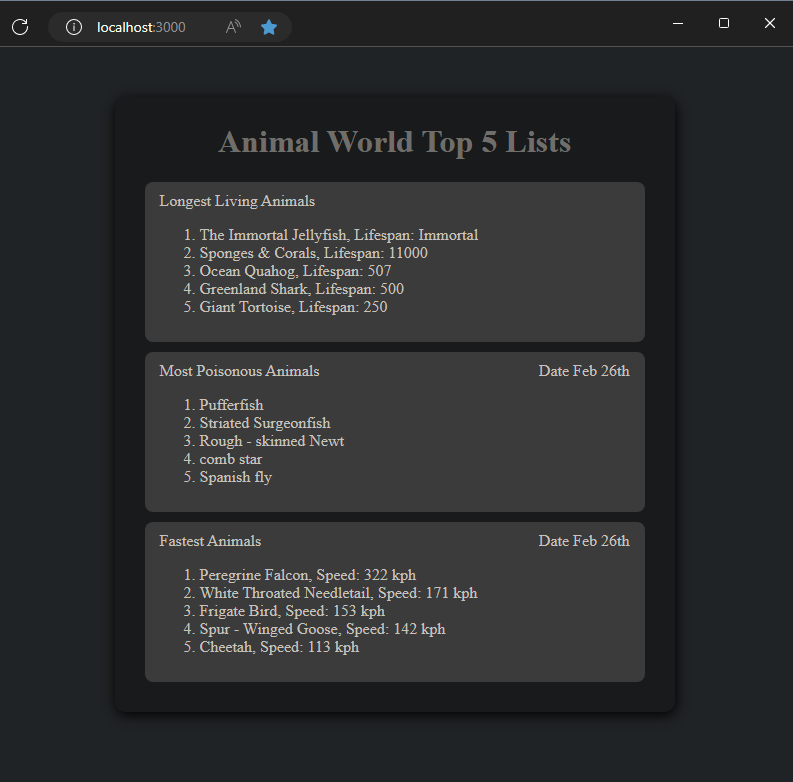
Fig. 1. Your simple website.
Let’s talk a little about SCSS. SCSS is a CSS pre-processor that extends traditional CSS with features such as variables, nesting, mixins, and functions. It helps you to write more maintainable and scalable CSS code. SCSS code is compiled into regular CSS. Personally, I like SCSS for all these reasons.
Step 6: Adding Webpack Bundle Analyzer to Your Configuration
The webpack bundle analyzer can be utilized to inspect and analyze Webpack bundles for duplicated code and optimization opportunities.
Let’s install the package:
npm install -D webpack-bundle-analyzer
You need to add the following two lines to the “scripts” section of your package.json file.
    "analyze": "cross-env ANALYZE=server npm run build:prod",
    "stats": "cross-env STATS=true npm run build:prod"
And let’s copy and paste the following code into webpack.prod.js.
// webpack.prod.js
const { merge } = require('webpack-merge');
const commonConfig = require('./webpack.common.js');
const MiniCssExtractPlugin = require('mini-css-extract-plugin');
const CssMinimizerPlugin = require('css-minimizer-webpack-plugin');
const TerserPlugin = require('terser-webpack-plugin');
const ESLintPlugin = require('eslint-webpack-plugin');
const BundleAnalyzerPlugin = require('webpack-bundle-analyzer').BundleAnalyzerPlugin;
const isStats = process.env.STATS === 'true';
const mode = process.env.ANALYZE ?? 'disabled';

const prodConfig = {
    optimization: {
        minimize: false,
        minimizer: [
            new CssMinimizerPlugin(),
            new TerserPlugin({
                parallel: 4,
            })
        ],
        splitChunks: false
    },
    devtool: false,
    module: {
        rules: [
            {
                test: /\.css$/i,
                use: [
                    {
                        loader: MiniCssExtractPlugin.loader,
                    },
                    'css-loader',
                ]
            },
            {
                test: /\.s[ac]ss$/i, // https://webpack.js.org/loaders/sass-loader/
                use: [
                    {
                        loader: MiniCssExtractPlugin.loader,
                    },
                    {
                        loader: 'css-loader', // https://webpack.js.org/loaders/css-loader/
                        options: {
                            modules: {
                                mode: 'icss'
                            }
                        }
                    },
                    {
                        loader: 'sass-loader',
                    }
                ],
            },

        ],
    },
    plugins: [
        // https://webpack.js.org/plugins/mini-css-extract-plugin/#advanced-configuration-example
        new MiniCssExtractPlugin({
            filename: '[name].css',
            chunkFilename: '[name].chunk.css',
        }),
        new BundleAnalyzerPlugin({
            analyzerMode: mode,
            generateStatsFile: isStats
        }),
        new ESLintPlugin({ failOnError: true }),
    ],
};

module.exports = () => {
    console.log('ProdConfig config loaded');
    return merge(commonConfig, prodConfig);
};
When you run the npm run analyze command, two npm scripts are executed. First, the ANALYZE environment variable is set to ‘server’, and then the “build:prod” script is run. The “analyzerMode” is set to “server”, which allows the Bundle Analyzer to start in server mode and launch an HTTP server to display the bundle report. The stats script enables the Bundle Analyzer to generate a webpack stats file in the bundle output directory. You can visualize the stats file using online tools such as Webpack Visualizer.
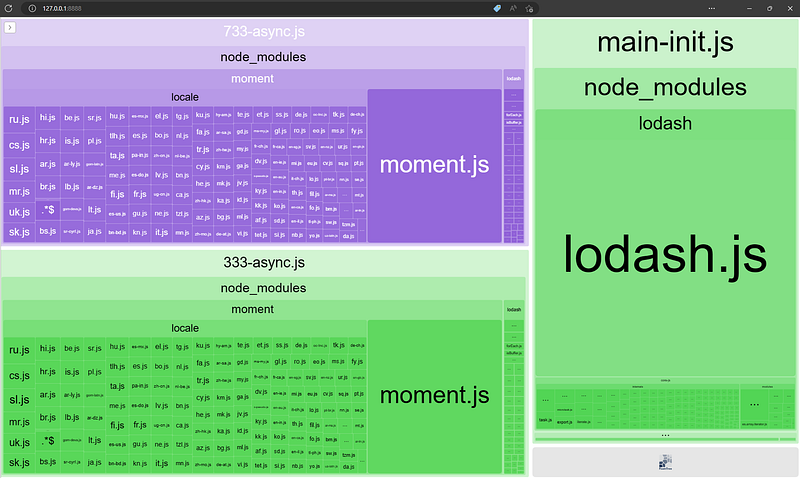
Fig. 2. The bundle analyzer report is displayed in the browser. (1.95MB)
Let’s optimize the code by eliminating the duplication of the lodash and moment libraries, which are currently included in both chunks.
Step 7: Analyzing and Optimizing Your Webpack Bundle
Repository link — modified files.
Repository link. — contains all the code for the steps completed up to this point.
Webpack’s splitChunks optimization feature allows you to split bundled code into smaller, independent chunks to reduce load times and improve performance.
Let’s add the following to the splitChunks configuration :
   ...
        splitChunks: {
            chunks: 'all',
            minSize: 0,
            cacheGroups: {
                defaultVendors: {
                    test: /[\\/]node_modules[\\/]/,
                    priority: -10,
                    reuseExistingChunk: true,
                },
                default: {
                    priority: -20,
                    reuseExistingChunk: true,
                    minChunks: 2,
                },
            },
        },
 ...
The splitChunks configuration specifies two cacheGroups which are used to group common modules into separate chunks.
The minSize option controls the minimum size of chunks that are split into separate files. If chunks is set to ‘all’, it means that code splitting is applied to all chunks, including initial chunks and async chunks.
The first group, defaultVendors, matches any module that comes from the node_modules folder using the regular expression /[\\/]node_modules[\\/]/. This group has a priority of -10, which means that it has a higher priority than the default group. reuseExistingChunk: true is set to indicate that if a chunk already exists that contains the matched modules, it should be reused instead of creating a new one.
The second group, default, has a lower priority (priority: -20) and will only include modules that are used in at least two chunks (minChunks: 2).
It’s time to run the npm run analyze to see what has changed.

Fig. 3. The bundle analyzer report is displayed in the browser. (1.3 MB)
As you can see the lodash and the moment duplications are eliminated. The way you import lodash is important. Using the named import “import { forEach } from ‘lodash’;” the parsed size of lodash is 531 kb. This is because lodash uses the CommonJS module syntax which is not tree-shakeable. The first option for optimization is to import only the import the relevant function by using default imports: “import forEach from ‘lodash/forEach’;”, in which case it’s size will be reduced to ~100 kb. Or you can use the lodash-es package, which has built-in support for tree-shaking due to its use of ES modules. The size will be similar to using default imports and you can use the more convenient named import. As a rule of thumb always check the bundle analyzer when you adding a library.
Let’s also shrink moment.js a bit too. The best way is to use day.js or date-fns instead, since the package is in maintenance mode. But as an example it will do it. You probably don’t need all the locales (502 kb) in Moment.js, so you can exclude the rest with webpack’s ContextReplacementPlugin.
Open your webpack.common.js config and the following lines to the imports and to the plugins:
const { ContextReplacementPlugin } = require('webpack');
...
 plugins: [
...
        new ContextReplacementPlugin(/moment[/\\]locale$/, /(en-gb)$/),
        new CleanWebpackPlugin(),
    ],
This solution reduces the bundle size by 332 kb. You can experiment with changing the splitChunks configuration. For example, change the minSize to 180000 or change the chunks option. More info | SplitChunksPlugin.
So far the parsed size of the bundle has been reduced from ~1.9 MB to 421 kb, but you can minimize the bundle size by setting the minimize option true in your webpack.prod.js config, this way your bundle size will reduce to ~115 kb.
There are other tweaks you can make to Webpack if you read the documentation. In your webpack.common.js and webpack.prod.js config files change the chunkFilename and the filename to the following:
// webpack.common.js
output: {
    filename: '[name].[contenthash]-init.js',
    chunkFilename: '[name].[contenthash]-async.js',
...

// webpack.prod.js
new MiniCssExtractPlugin({
       filename: '[name].[contenthash].css',
       chunkFilename: '[name].[contenthash].chunk.css',
     }),
And in the webpack.prod.js configuration add the following to the optimization section:
chunkIds: 'deterministic',
runtimeChunk: 'single',
moduleIds: 'deterministic',
What do they do? In short:
chunkIds: 'deterministic': This ensures that the generated chunk IDs are deterministic based on the contents of the chunk, which can help with caching.runtimeChunk: 'single': This extracts the runtime code into a separate chunk that is shared between the generated chunks.moduleIds: 'deterministic': This ensures that the generated module IDs are deterministic based on the content of the module, which can help with caching.[contenthash]: This specifies the name format for any chunks generated by code splitting, with a unique content hash to ensure cache busting.
Browser caching can improve website performance by reducing the number of requests to the server and allowing resources to load more quickly. Cache-busting is used to ensure that cached resources are up-to-date and to force the browser to download new versions of resources when they have changed, using techniques such as the [contenthash] placeholder in the Webpack configuration. More about caching.
Let’s modify the splitChunks section of webpack.prod.js:
// webpack.prod.js
....
// https://webpack.js.org/plugins/split-chunks-plugin/#splitchunksname
const uniqueName = (module, chunks, cacheGroupKey) => {
    const allChunksNames = chunks.map((item) => item.name).join('~');
    return `${cacheGroupKey}-${allChunksNames}`;
}

const prodConfig = {
   ..........
        splitChunks: {
            chunks: 'all',
            minSize: 0,
            name: false,
            cacheGroups: {
                defaultVendors: {
                    test: /[\\/]node_modules[\\/]/,
                    priority: -10,
                    reuseExistingChunk: true,
                    name: 'defaultVendors',

                },
                asyncVendors: {
                    test: /[\\/]node_modules[\\/]/,
                    priority: 10,
                    reuseExistingChunk: true,
                    chunks: 'async',
                    name: (module, chunks, cacheGroupKey) =>
                        uniqueName(module, chunks, cacheGroupKey),
                },
                default: {
                    priority: -20,
                    reuseExistingChunk: true,
                    minChunks: 2,
                    name: 'default',
                },
            },
        },
 .........
};
You can provide a string or a function to name each cacheGroups. There are several ways to group modules using cacheGroups.
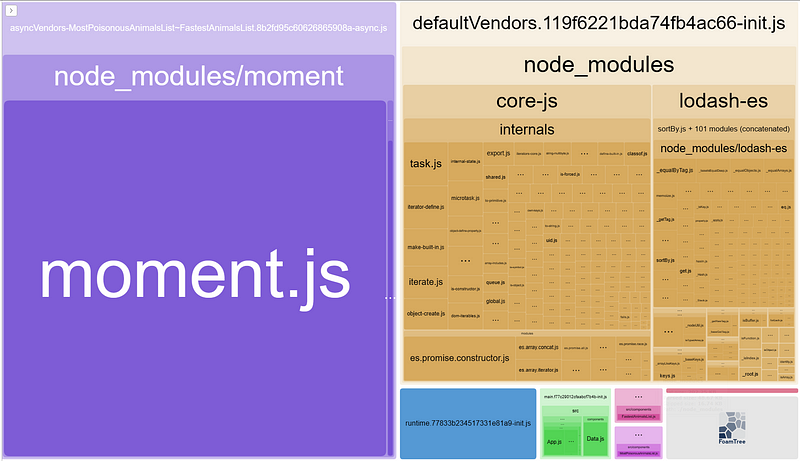
Fig. 4. The result of the configuration.
The second cacheGroup (asyncVendors) is restricted to asynchronously loaded chunks (i.e., chunks that are loaded after the initial page load). The chunks property is set to ‘async’ to specify this restriction. The name property is set to a function that generates a unique name for the split chunk using the uniqueName function.
Step 8: Integrating ReactJS into Your Project
Repository link — modified files.
Repository link — contains all the code for the steps completed up to this point.
To add React to your project, install it by running the following commands:
npm install -D react react-dom @babel/preset-react @babel/eslint-parser
npm install -D @pmmmwh/react-refresh-webpack-plugin react-refresh
The first command installs the following packages:
react: A JavaScript library for building user interfaces.react-dom: A package that provides a way to interact with the DOM (Document Object Model) using React.@babel/preset-react: A preset for Babel, a tool used to transpile modern JavaScript syntax into a format that can be understood by older browsers. This preset is specifically for transpiling JSX syntax, which is commonly used in React.@babel/eslint-parser: A parser for ESLint, a popular JavaScript linter. This parser allows ESLint to understand Babel-transpiled code with React syntax extensions.
The second command installs the following packages:
@pmmmwh/react-refresh-webpack-plugin: A plugin for Webpack, that enables Fast Refresh in React applications. This allows developers to see changes to their code in real time without having to manually refresh the browser.react-refresh: A runtime for Fast Refresh that works with the above plugin.
Once the installation is complete, some modifications are required. First, update your configurations, and then modify the project files accordingly.
In your babel.config.js configuration file add @babel/preset-react and the react-refresh/babel conditionally.
const babelConfig = {
    presets: [
        [
            '@babel/preset-env',
            {
                targets: ['> 0.25%', 'not dead'],
                modules: false,
                useBuiltIns: 'usage',
                corejs: { 'version': 3.28 },
                debug: false,
            }
        ],
        '@babel/preset-react',
    ],
    plugins: [],
};

module.exports = api => {
    api.cache.using(() => process.env.NODE_ENV);
    babelConfig.plugins = [];
    api.env('development') && babelConfig.plugins.push('react-refresh/babel');
    return babelConfig;
};
You can uncomment the relevant lines in your .eslintrc.js configuration file to enable the ESLint rules and settings.
module.exports = {
    'parser': '@babel/eslint-parser',
    'env': {
        'browser': true,
        'es2021': true,
        'node': true,
    },

    'settings': {
        'react': {
            'version': 'detect',
        },
    },

    'extends': [
        'eslint:recommended',
        'plugin:react/recommended',
        'plugin:import/recommended',
        'plugin:import/errors',
    ],

    'overrides': [],

    'parserOptions': {
        'ecmaVersion': 'latest',
        'sourceType': 'module',
        'ecmaFeatures': {
            'jsx': true,
        },
    },

    'plugins': [
        'react',
        'import',
    ],

    'rules': {
        'indent': ['error', 4],
        'eol-last': ['error', 'always'],
        'linebreak-style': ['error', 'unix'],
        'quotes': ['error', 'single'],
        'semi': ['error', 'always'],
        'no-extra-parens': 'error',
        'camelcase': 'error',
        'curly': 'error',
        'comma-spacing': [
            'error',
            {
                'before': false,
                'after': true
            }
        ],
    },
};
To enable React Refresh for HMR, you can add the necessary configuration to your webpack.dev.js file.
const { merge } = require('webpack-merge');
const ESLintPlugin = require('eslint-webpack-plugin');
const { HotModuleReplacementPlugin } = require('webpack');
const ReactRefreshWebpackPlugin = require('@pmmmwh/react-refresh-webpack-plugin');
const commonConfig = require('./webpack.common.js');

const devConfig = {
    devServer: {
        port: 3000,
        hot: true,
    },
    devtool: 'eval-cheap-module-source-map',
    module: {
        rules: [
            {
                test: /\.css$/i,
                use: [
                    'style-loader',
                    'css-loader',
                ],
            },
            {
                test: /\.s[ac]ss$/i, // https://webpack.js.org/loaders/sass-loader/
                use: [
                    {
                        loader: 'style-loader',
                    },
                    {
                        loader: 'css-loader', // https://webpack.js.org/loaders/css-loader/
                        options: {
                            modules: {
                                mode: 'icss'
                            }
                        }
                    },
                    {
                        loader: 'sass-loader',
                    }
                ],
            },
        ],
    },
    plugins: [
        new HotModuleReplacementPlugin({}),
        new ReactRefreshWebpackPlugin(),
        new ESLintPlugin({ failOnError: false }),
    ],
};

module.exports = () => {
    console.log('DevConfig config loaded');
    return merge(commonConfig, devConfig);
};
To complete this step, navigate to the ./src/components/ directory and modify the following files: App.js, MostPoisonousAnimalsList.js, FastestAnimalsList.js, and LongestLivingAnimalsList.js. Also, modify the index.js file located in the ./src/ directory. You can find these files in the appropriate folder for this step in my GitHub repository.
References
All references are linked within the text.
Helpful links for further reading
Babel, JavaScript Transpiling And Polyfills | Getaround Tech
Config Files · Babel (babeljs.io)
How to use Webpack with React: an in-depth tutorial (freecodecamp.org)
Webpack (part-2) | Suprabha’s Blog
React setup with webpack for beginners — DEV Community
Creating a React app with Webpack (jsramblings.com)
Best Guide on Dynamic Import in JavaScript for Importing Modules | WM (webmound.com)
What you don’t know about Babel preset-env | by shahar taite | PerimeterX | Medium
5 Methods to Reduce JavaScript Bundle Size | by Chameera Dulanga | Bits and Pieces (bitsrc.io)
Setting up Webpack for Development and Production | by Bharat Soni | JavaScript in Plain English
An in-depth guide to performance optimization with webpack — LogRocket Blog